
You know you’re doing something “right” when people take the time to ask you how you are doing it. Back in the day… when I was just starting out as a filmmaker, I would guard my secrets closely. It was a race for resources back then, and I didn’t want anyone to get my meat.
That perhaps is the worst sounding metaphor I’ve ever written.
Literary faux pas aside, and thanks to savvy people like Phillip Bloom and Vinny Laforet, I’m perhaps a bit older, wiser, and more secure now. I make a point of saying this from the top because I think it’s important you share your knowledge. Gaurding it is a false sense of security. There is already a kid younger then you that is better then you by the time you read this, so don’t worry about your meat, just go vegan.
Still not any better.
Enough old man gibberish (I’m 32 by the way;) onto the friggin’ settings.
The key settings for good drone footage is this holy trinity:
1) Proper camera settings
2) Proper Drone Operation
3) Proper Color Grading
There is no holy grail of camera settings that will guarantee you will have beautiful footage. Sorry kids, Trix are for kids (they still say that? I miss the 80’s. Shit. Im actually 35. Sorry)
1) Camera Settings:
We’re using the GoPro Hero 3, 4, or 5. The rundown is this:
• Turn your wireless off. It sucks up juice and can interfere with your drone/FPV.
• Use ProTune. Protune is the flatpass color space that will allow you to get the most range out of your footage. Highlights will be less blown out, shadows less crunchy. You will have to Color Correct and be a man about it.
• Shoot 1080p at 60fps. If you really want, 2.7k at 48fps. You want to over crank (slowmo) so that it will play back at 23.976fps in post. This gives you the buttery nice footage everyone creams over.
• Set your white balance. Usually I’m around 5500k. If you leave it on auto, you can have a color shift while filming which is a PITA to get out in post (PITA is Pain In The Ass BTW) (BTW is By The Way).
• Do not use GoPro color. Use Flat. Who the hell are they to tell you what is the correct color anyway? What is this? The 40’s? Am I allowed to ride the bus mister? (Seriously thought, if you are not comfortable with Color Correcting its not the worse thing in the world to use it).
• Limit your ISO to 400 if you are shooting daylight. You want to keep your grain down to a minimum and your shutter as slow as possible. Higher shutter can result in jerky footage and even result in the dreaded “jello effect” (will Bill Cosby’s past never stop hurting us…)
• Do yourself a favor and slap a good quality ND filter and/or Polarizer on you GoPro. You’ll be able to shoot at a lower shutter speed and you’ll thank me for it afterwards.
• Set your sharpness down to LOW. No one likes a show off. Besides, you don’t want your footage to look like your dad shot it on his MiniDV Z10 from the 90’s, or worse, an early Paul Thomas Anderson film…
• Finally, choose your lens option. Superview is a gimmick. Ultra wide is ok, but listen here… you will have to take it in post and do some “optical compensation” on it to make it look like you’re not flying on a magic front door and seeing the world through a peep hole. The result is in a pretty severe letterbox, which can be dope, if you’re Quentin Taranteeno. The same goes for Wide (less of a letterbox) and Medium is usually the best option for best quality. I’ll explain more of this in the post section, just trust.
2) Fly Right.
I am happy to say that I get lotsa calls from creatives and filmmakers that need some aerial footage and they want me to knock it out of the park for them. Then they ask my rate, at which time I tell them. My day rate is more then a basic drone costs. Some filmmakers get confused about this, and some have the cajones to ask, “well, why wouldn’t I just buy my own drone and shoot it myself” to which I tell them, they absolutely should. That’s a much better plan, and I’m obviously don’t understand how money or commerce works, besides, what is this strange device near my ear with the small people inside?
Let me set the record straight. Just like you can buy a camera and “film” something, it doesn’t make you a DP. You can also buy scalpels on eBay for $5.74 but that don’t mean you a doctor, you dig? And doctors charge WAAAAAY more then I do FYI (FYI stands for For Your Information).The reason I charge more then my equipment is the following:
• My drones are not “stock”. They are the hot rods of flying machines. They have FPV, come with client monitors, are specifically calibrated to shoot film, all the trim has been manually set, and they have been tested over and over. So really, while you could buy a drone with what I charge, you could only afford the Dodge Dart of drones my friend.
• I come with at least two drones. Yes. Two. I own 6. I own 6 and come with at least 2 is because, well, they fly, so they can crash. And they do crash. They are machines, and nothing’s perfect. Especially if you are taking risky shots, then, you better have a backup plan.
• They are insured. Up to 1,000,000.00 in damage. Yes. A million. If I break them, or break you, then I have a company that pays you/them money. I’m a professional, and that costs money.
• Flying for one day is more like 3 days of work. No one considers prep-time with drones. It takes a day to charge the 20 batteries I bring with me to set. A whole day. And you have to babysit them because they have a tendency to explode by themselves, usually when no one is watching. They are dangerous, and have to be treated with respect, which takes time, and that costs money. Checking the gear thoroughly as well before and after is key, as they are potentially flying death machines. The day before and after is what you are paying for to assure they don’t take your head off.
• Finally, YOU ARE PAYING FOR MY EXPERIENCE MORE THEN ANYTHING. If you think you can buy a drone and fly it as well as someone that has been doing it for years, go ahead. Maybe you can. Maybe you’re a savant of the skies. But lemme just offer you this little nugget: years ago, when I first started, I went through 3 drones before I even took a job. And I’ve been playing video games since I was 6, not to mention am an accomplished rally and motorcycle driver. These are not as easy to fly as you think they are, but please, don’t let me stop you. You gotta learn sometime.
So you gotta fly right (jeez what an old man rant. I’m actually 37). What does flying right mean? Well, it means knowing three things:
A) Your craft
B) Your conditions
C) Your shot
A) This is the fun part, and where the experience really comes in. Every drone will fly differently, even if its the same model of drone, they all have a specific characteristic to them. On top of which, your drone settings will effect how fast they accelerate, bank, yaw, or rotate, and if they ease in or out of the rotation for you. On top of which the camera you are flying, the rotors you are using, even the type of props you use will effect flight. Sometimes I use PVC props as they are a little softer and make flying more like you’re driving an old Caddy. Sometimes you want carbon fiber props for speed and sharp controlling. You have to modify your craft and flying style based on the other two points.
B) Conditions are the control in this science experiment. The wind is going to decide a lot for you, as is the temperature, as is the sun’s position. Generally, and this is a very general statement, you never want to do a shot going upwind; let the wind work for you, switch off your GPS control and float down the airstream. This will give you silky smooth shots. You can also push the speed limits for your craft if you fly with your wind. As for sun, you have to be careful of the dreaded “prop shadow”. This happens when the sun is about 2 o’clock above your lens; the shadow of your props can buzz the sensor and create this lame rolling effect that you cannot take out in post. So be aware, and do some tests if you have to.
C) Finally the shot you want to capture will be important in this equation. Sometime the other two things in this list make it difficult to capture what the director has in his mind. You have to be creative (and sometimes persuasive). Generally it is better to fly backwards at high speed; this way you don’t get props in the shot. That means chase shots become follow shots. If you’ve ever tried to fly out a window or door from inside to out, you will quickly realize that the cross wind will play a major part. Coming around corners of buildings even chasing a vehicle that passes you can created a bump in your shot. You will have to be ready for that.
3) Post Magic
So you’ve made it this far. Good for you! Usually I just hand off the footage I shoot to the production and they have the fun of treating it in post. I always like to give them a little breakdown of my preferred post procedures, because I really feel that the footage isn’t done, and my job isn’t either, until they treat the raw footage a bit. Color Correcting they can do any way they wish, but there is some little tricks to help it look its best:
• You should transcode your footage to ProRes 422 and make sure you interpret your footage to play back at 23.976fps. The H264 that comes out of the GoPro is fantastic for what it is, but it’s not great to work with in post. You’re not getting any more quality out of the footage by transcoding it to ProRes, but, when color grading, you are lessening the possibilities of artifacts, and ultimately, keeping render times down as H264 is very labor intensive for the computer to work with.
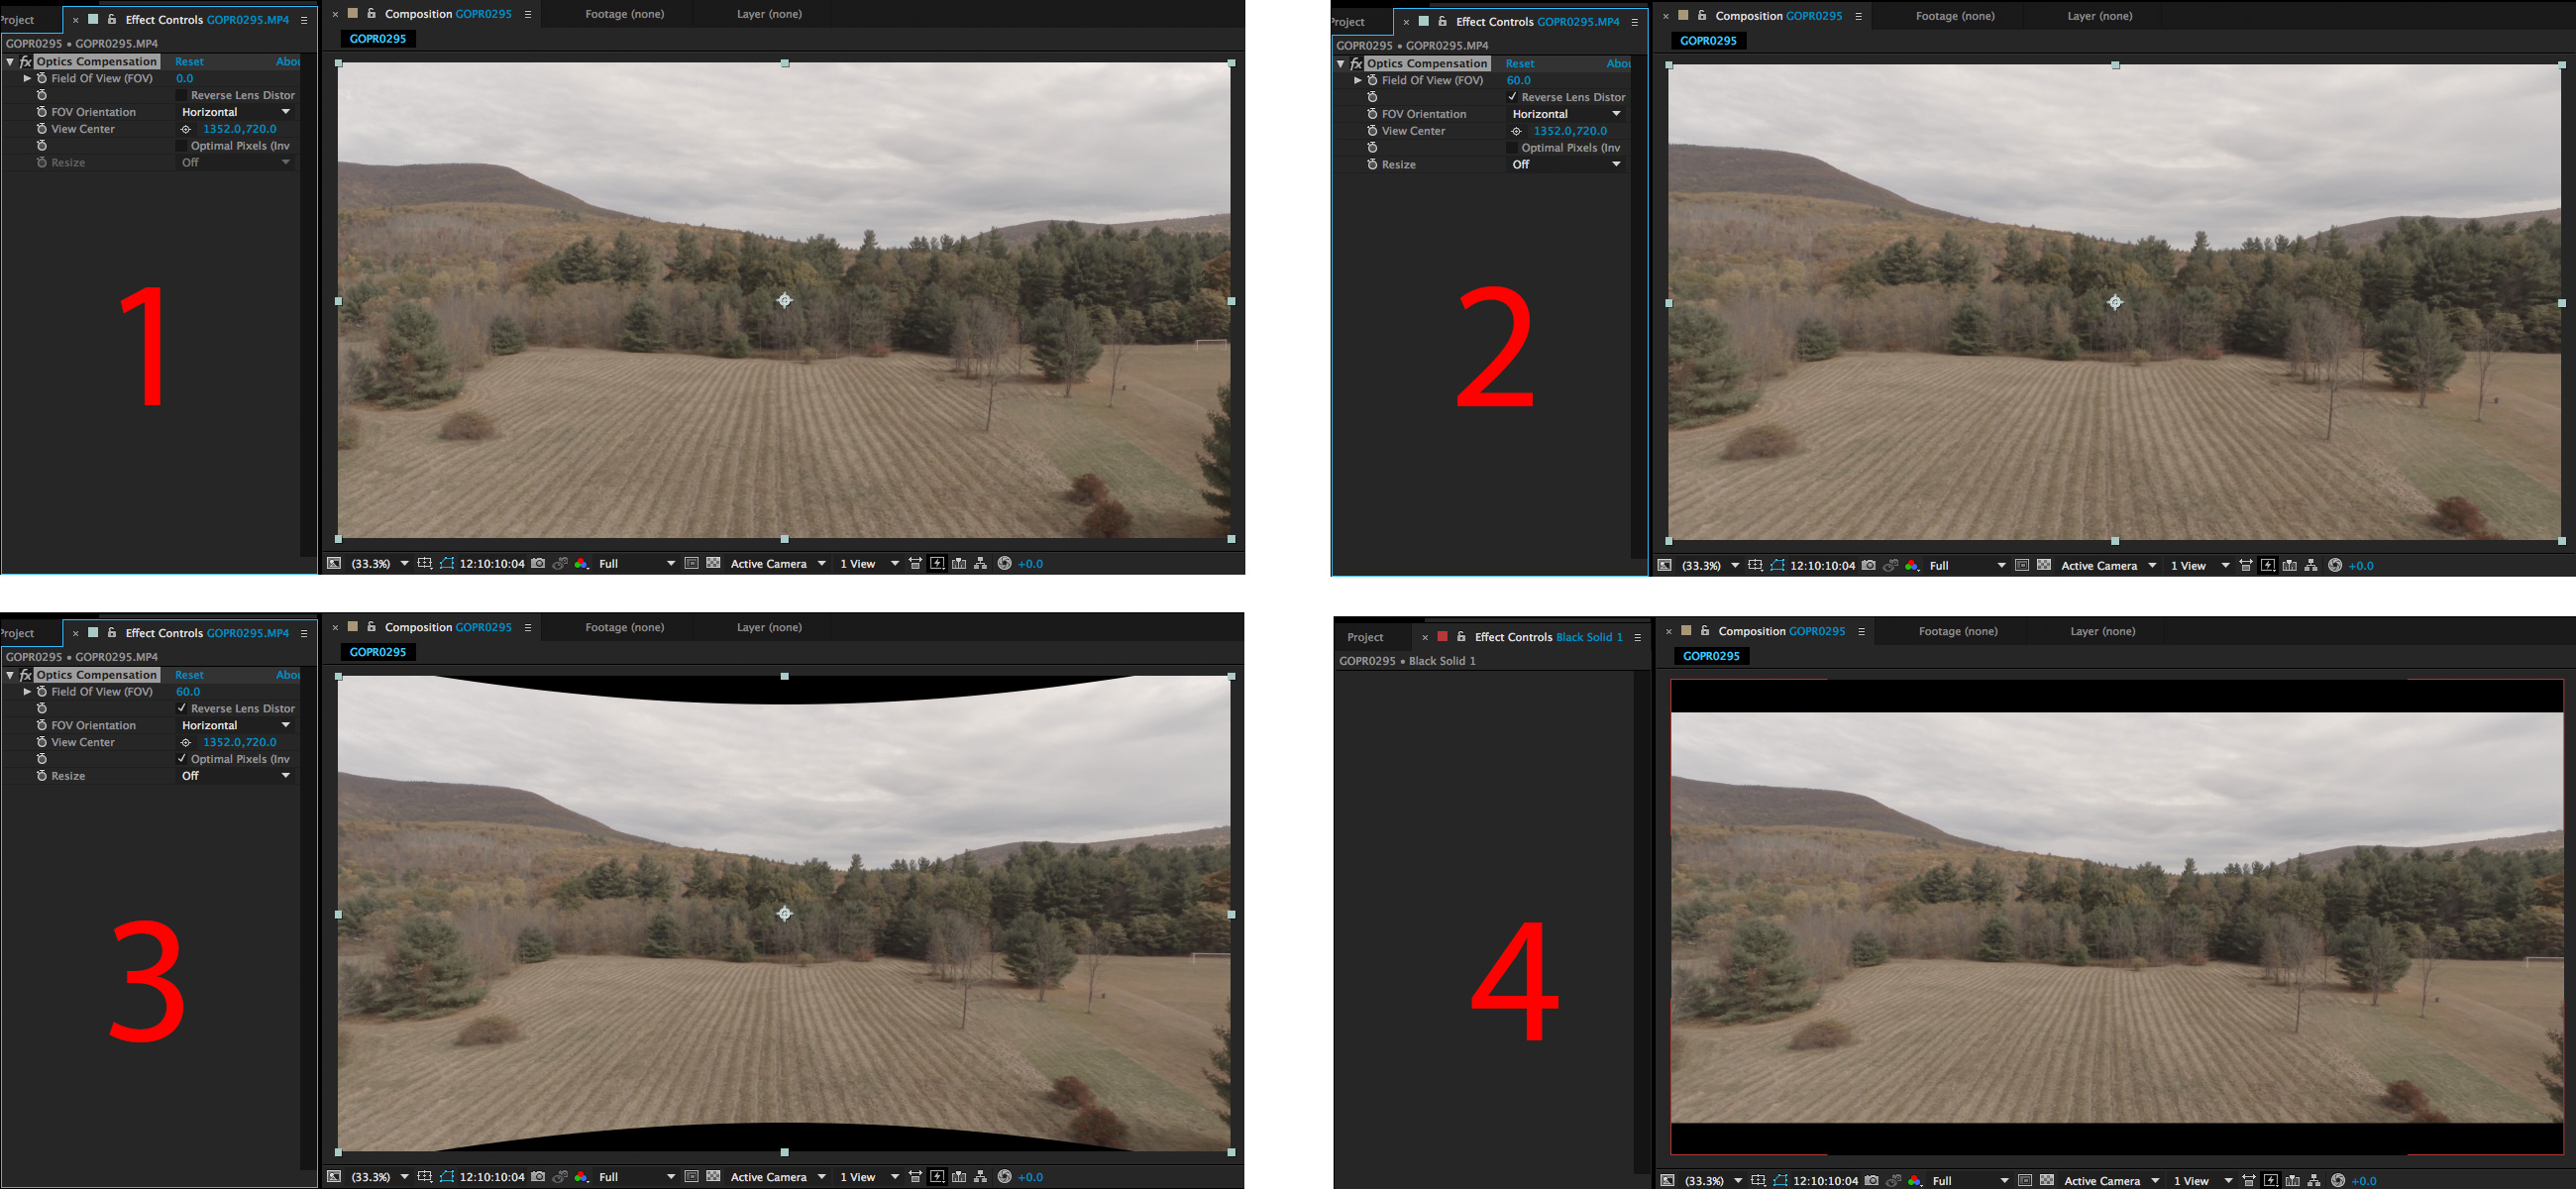
• You need to optically compensate for your fisheyed image. There are a few pluggins that can do this for you in FCX, FCP, Avid, etc. – what I use is good ol’ After Effects. Optics Compensation is an effect that comes standard and works like a charm. Here’s how it works, see the pics below:
1) Import your footage. Slap on Optics Compensation.
2) POV is the amount you are reducing the fisheye effect. 50-60 is a good place to start. Also click on “reverse lens disorder”, thats what takes it out instead of adds it.
3) Your footage looks better, BUT, you’re not showing your entire frame as its zooming in for you so you have no black pixels on screen. Click on “optimal pixels” to see what I mean. Now you have a bow of black above and below, but all of your beautiful frame.
4) Letterbox that shit like the pro’s (trim your comp size rather then add black bars if you want my 2 cents. No reason to waste bandwidth on black bars. There’s probably a race joke in there somewhere but I’m too old for that shit. Im actually 58.)
Wow. Yous did it. Now you’re g’damn Terrance Malik you handsome sonnovabitch.
• If you shoot super wide you will have a larger letterbox, if you shoot narrow you will have none. For my money, with “wide” you can get away without not letter boxing… sometimes. I always think it looks much more impressive taking out the fisheye and adding the letterbox. Cinematic and shit.
• Finally, color GRADE your film. There is a lot of great videos about the different between color correcting and color grading that I won’t bore you with, but I will say this, “color correcting is making one shot look like another so that all your shots look like they were filmed at the same place at the same time. Color Grading is giving your footage emotion, reason, and a unique characteristic that adds a personality to the footage that wasn’t there before.” Generally your footage will look all the same, you won’t need to color correct per se. But you should grade the film especially if you listened to me and shot “flat” with protune turned on. Crush down your blacks a bit, and stretch out your whites. Don’t add too much color back and you will have a beautiful film-like look. Another great plugin that I robbed from Phillip Bloom is Film Convert. It’s got a GoPro setting that basically takes all the guess work out. Also Lumetri in Premiere comes with GoPro presets that do a fine job.
And thats it folks. (I’m laughing inside, cause we’re at 2,370 words right now, so “that’s it” is kinda a joke. I’m staring at 40 people). There’s a few moving parts for making great drone footage, but once you get the hang of it, and you play with it a while, it will become second nature. Of course choosing the right track to edit to, and being an editing mastermind also makes what you shoot fly off the screen, but thats a whole other blog post.
In the end… this is one of the products:
Enjoy the settings! Happy flying y’all.
Rs
Roberto Serrini is a professional traveler who records his adventures in word, photography and film. He is a staff writer for Get Lost Magazine, a senior contributor to Trip Advisor, as well as a commercial film director and drone pilot. His work can be seen at www.robertoserrini.com where he can be contacted as well.

Great article. Thank you so much.
I still consider myself to be a noob with drones and in videography in general, but I do color correct and color grade in Final Cut and I get much better results with Protune. I’m definitely not a pro, but I’ve had enough training and practice to kinda-sorta know what I am doing. None-the-less, there are huge gaps in my knowledge. So a few questions if you have a moment…
1. On a Hero 4 Black, why not shoot in 4K at 30 or 24 fps?
It does force you to use Wide, but I find that I can salvage a shaky shot with the image stabilization in post because the extra resolution gives me more “wiggle room” – literally.
However, I’m concerned that 4K, while higher resolution, may not capture colors as nicely. Am I crazy? (My target is 1080p 30fps (or occasionally 24fps) on export – after fish eye removal and image stabilization)
2. Do you disable the spot meter, or leave it on?
In snow, i’m having a hard time. As the gopro sweeps past a dark forest onto a snow field and back again, I get huge exposure shifts that I have to correct in Final Cut. I was thinking about disabling the spot meter to see if it helps.
3. On a Hero 4 Black, how about using “Native” white balance?
My assumption is that it would be best if your are going to color correct in post.
4. How do you import your GoPro footage?
I’ve been using GoPro studio – just to remove the fisheye. (and cut the most obviously unusable footage).
I’ve heard that with the latest version of GoPro studio you get the best image quality doing it this way and then editing, color correction, grading all done in Final Cut or Adobe.
LikeLike
Hey Erik, thanks for the compliment.
I like to think that we are all noobs. Except Phillip Bloom. He’s Jesus Christ.
1. First, 4k is beefy, and I much prefer the 60fps. The gimbal will definitely keep your shots smooth, but never 60fps played back at 24fps smooth. But, if you are delivering in 4K then I would say use 4K. Im with you; most my delivery is in 1920×1080 so if the shoe fits, shoot in it.
2. I usually disable anything that does something “automatically”. If you are going inside to outside (or light to dark or vice versa) then there is no way around letting the camera adjust its settings for you. But.. if you are in a controlled lighting environment I say take your pants off and free ball it without any auto controls… your footage will be consistent.
3. Native always read to me that it was GoPro’s take on the color space. Because most of the shooting is outdoor I know the color temp of the sun (3200K) and can be sure that it will give me true whites. Of course if it is overcast or in certain times of year you may want to tweak that, to me it never really mattered because it’s generally easy to shift back to white in post. I like the science of it.
4. Poor ol’ Final Cut… I started on her back when it was FCP3… wowsers. I fear that the ol’ girl has reached her limit… now, I stay mostly in Adobe world… I usually edit the native footage in Premiere (no transcoding needed) and then have premiere send my sequence over to After Effects where I remove the fisheye with Optic Compensation. I also do any cleanup or sfx I may need to do, then send it back to Premiere to color grade and Conform. SOMETIMES I throw it over to DiVinci Resolve for grading, but only if I’m trying to impress someone;) After that I export a compressed version right out of Premiere. There is no loss of quality, and no sacrifice of time transcoding. One of many workflows but has worked for me flawlessly.
Thanks for writing Erik, and happy flying!
Rs
LikeLike
Robert, been a long time…this page is great and you are very unusual for sharing. To all others, Robert and I worked together years ago and i can only imagine he has got a lot better at what he does, and he was bloody good back then. He was also one of the nicest guys i have come across in the industry. If you are looking here and thinking of hiring him i would say do it now he may get booked if you wait too long !!!!
LikeLike
Well dear me… that is a fine comment indeed;) Very much appreciated old friend, and do hope we get to work together many more times in the future!
LikeLike
Hi there, first thank you for the well detailed article! I’m having trouble with my footage coming out too white and hazy. Getting a little overwhelmed with all these settings and nothing seems to work the same twice, of course atmospheric conditions are always different so I’m trying to learn what settings work best for every situation. I shoot usually 2.7k 30 because I’m on a gp4 silver, ProTune on color Flat 400 ISO Low Sharpness and 0 EV compensation. I’m thinking an ND filter would go a long way for me and perhaps I should be going -.5 or -1 on the EV comp during the day? Or perhaps this can all be done and post but I haven’t the skills apparently to be able to clear it up completely. https://www.dropbox.com/s/qkwh41t378hxwo2/2015-07-05%2018.23.36.png?dl=0
The particular photo that shows what I’m referring to. Any insight is greatly appreciated for this drone novice.
LikeLike
Hey Alex –
Settings sound pretty good. Generally if you shoot protune with sharpness down, you will get a very flat (hazy) look. The idea here is that your taking all your color information and squeezing it in the middle of your histogram, basically removing all contrast, which in turn, allows you to grade it in post with a little more latitude. Your image doesn’t look too far off from what I get, and all I can say is in whatever editing program you use, put a luma curve on it, and drop down the darks, and boost up the whites. Should look like a “S” leaning forward. If you’re not looking to do any grading in post, then I would set it to Auto and let the GoPro do the rest. It doesn’t do too bad of a job. Of course brighter days will give you more contrast, and overcast days will give you less, and yes, a ND filter I find is a must, to keep shutter speed down and offer a more dynamic range in your image.
Hope that helps and happy flying!
http://www.nycdroner.com
Rs
LikeLike
Wow super quick response! Awesome so I just need to keep working on my post skills. I’m using Photoshop but I’m a total noob and I have been playing with curves. Thanks for the insight I’ll keep working and learning!
LikeLike
Great read. A lot of good info thanks.
I Found your blog post because I was looking for some answers to a JELLO problem I’ve been having as of lately. I’ve been shooting mostly at 2.7K 24fps because I like the larger format so that if I get some props in the shot I can crop them out with out any loss of quality. I like the 24fps because its more cinematic but I’m thinking that might actually be the problem. I shoot mostly ion the med FOV so I am going to do some tests at 1080 60fps and see if it helps. Ive tried everything else so far, balanced props, ND filters, I even bought a hero 4 black because its the newest camera so it must be better but the jello was just as bad. Frame rate is really the only thing I haven’t changed. So many variables
Michael
LikeLike
It is a strange little recipe that makes a perfect shot. Lots of people don’t realize that there is so many variables you need to have locked down to get good looking footage. I think you are on the right path; definitely shooting with a ND filter to slow your shutter will help, and frame rate can definitely be the culprit. One other thing you may want to fiddle with is your dampers; those little rubber “balls” that connect your gimbal to the camera (you are using a gimbal yes?) … sometimes they are too stiff, or too jelly and that can throw you off. Lastly, and maybe the most difficult, is calibrating your rotors… they can be off and causing a shutter which would shake your camera…
lots to consider but at least hope is not gone;) happy flying!
LikeLike
Thanks for your response. Hahah yes I am using a gimbal the H3-3D on a Phantom 1. I have been flying this setup for about a year. I have another P1 with the H3-2D Gimbal that I was flying before that but it sits in the case as a backup and doesn’t get much air time at this point.
I have done most of the things you suggested including switching out the dampers I can’t remember if I had hard ones and put soft ones in or vice versa. I tried balancing the props and they were actually not too far out of balance. There are so many variables I couldn’t seem to get them under control to get consistent results. On one shoot it would be fine and on the next shoot the footage would be unusable.
I went out to fly Sunday morning to shoot at different frame rates and see how it affected the footage well…. I flew this rig into the the Savannah River. #FAIL I had a compass issue when I powered up so I did the whole compass dance got connected to satellites locked in a home position took off and she immediately banked to the right and went full speed right into the water.
So needless to say I don’t need to worry about why this rig was not consistently giving me good footage because it is on the bottom of the River. Luckily it did bank right and into the water instead of banking left and hitting a parked car a building, or a person or worse flying off and having no idea where it went down. The bottom line is I’ll be doing a much needed upgrade here very soon and this jello thing will benothing but a learning experince.
LikeLike
Jeez Louise! Thats some news… damn man, so sorry to hear that… well, if nothing else, know that I have gone through a few in my time… like the time I shot a P Diddy music video and was introduced as “one of the world’s best drone pilots” to only fly directly into a tree not 2 minutes later. Diddy was not happy. It happens; they aren’t perfect, and even if you are the best pilot around, they can still fly to the bottom of a river for no good reason.
I will say this (hindsight is always 20/20 right…) It sounds like you did all the right start ups… locking satellites and calibrating compasses. I personally never trust any of it and take off without GPS. I then usually switch over, and keep my finger on the the trigger to switch back, because, again, I don’t trust it. More then a few times has she tried to fly away until I pull the leash and get her off GPS.
Well, don’t let it phase you too much… nice thing about the phantoms is that they keep dropping in price. Best of luck, and happy flying.
LikeLike
This is a fantastic entry. I’ll be sure to come back to it a few times as I continue to do this. Do you ever use your drone with the GoPro to get still shots? I’ve been playing with which way to setup the camera for the best quality shots and I would like a second opinion if you have one. Currently I just shoot at the highest quality my Hero 4 silver can run and export the image from premiere, but is there a better way?
LikeLike
thanks Tyler – I don’t really do any still photog with the drone – its mainly only video – and as I understand it if you shoot in 4K video you are looking at basically ~9 megapixel stills … the go pro will shoot 12 megapixel bursts, so if you are looking for higher quality stills it might be the way to go vs. just pulling stills from video… the issue for me would be framing; you would need to frame your shot via live view, and then remote release the shutter … this is a different type of setup then I typically use for video. Either way, hope you get the images you’re after and happy flying!
LikeLike
Thanks for this, much appreciated. I’m having real trouble deciding whether to get the Inspire 1 or the 3DR solo as I’ve never had much fun with GoPro not having it look like ass, mainly the fisheye distortion.. I don’t have a second pilot / cinematographer I trust to ‘dance in the sky with me’ as we film shots so I keep thinking 3dr as a relatively solo operator is a god send, although its got a GoPro stuck on it.. I see a lot of awesome footage on the GoPro site once they have worked post-magic on it, though I’m mixing it in with C100’s and to be C300mkII’s and the Inspire seems a much greater camera.. ? I’m in a ‘fly static shots solo with the Inspire and teach my assistant to either fly or do camera control’ or ‘do complex cable cam start stop stuff with the 3dr and get average footage that looks like a peep hole / flying door.. any thoughts? Thanks 🙂
LikeLike
Hey Philip, thanks for reading;)
So my feelings is that as you go bigger, bigger rigs, bigger cams, you need a second op for sure. Depends on the type of work you are doing and your style. Personally I like to work fast and quick, and be in and out in minutes, not hours. Bigger rigs mean more equipment, and more difficulty getting in and out of locations. For my money the Phantom II with the Zenmuse fits the bill most of the time. The Hero 4 is a killer camera, and shoots 4k which is fantastic. If the fisheye is bothering you take it out in post with AE and optical compensation. Pretty easy process. Otherwise the Inspire is also a miracle in the sky; fast, easy and secure. The camera I don’t believe has the dynamic range that the go pro has (also I like that you can use the go pro for other settings, in its own housing, mount it on cars, etc) but also a great option. All in all I would suggest heading over to http://www.dslrpros.com and see what kits those guys have… they are flawless.
Happy Flying!
Rs
LikeLike
Good morning. Almost a year later and you are still getting questions and comments. I sign of some great work I think. I don’t like to think of myself as lazy, but I find myself looking for the setting that other droners have used for filming certain scenes. I feel like losing the 4th of July fireworks to a bad setting on my GoPro would suck and then I would have to wait until next year. Christmas light would give me a couple of opportunities to “get it right”. I have now started keeping a log of camera settings and evaluations of those settings to assist my memory.
Anyway, besides the above guidelines (awesome by the way, thank you), do you have any “go to” settings for night, snow, the golden hour, ect…
Thank you again for your guidance and support of making better videos around the world.
lance
LikeLike
Hey thanks for writing! I would say you’re definitely on the right track; I can say, in all modest honestly, that anything I “know” is from a lot of trying and error. Testing is the way to go for sure, and I think christmas lights are a great way to experiment. My only tip would be that you are probably going to be really just dialing in your ISO more then anything else. See what the lowest ISO is for you to capture visible footage without getting too much noise. I’d almost say just putting it on AUTO might be your best bet, I would just be weary that the flashes of light will bug out the camera if its on auto. Unfortunately I don’t find much application for night shooting (with a go pro) so most of my knowledge is in the daylight department.
Snow… biggest help here is a ND filter and/or Polarizer. There is little contrast in the snow, and its super bright, so you have to darken down your lens so you can shoot at lowest shutter rate possible. Also, while shooting RAW/FLAT (protune) is great in general, sometimes… sometimes… you may want to shoot not protune, and have GoPro manage saturation and contrast in the snow. Reason being is that there is usually so little color information with snow scenes, you could be doing yourself a disservice in post without having positive values in saturation and contrast.
Golden hour or any other type of daylight shooting I would follow my recipe in the post, they seem to offer consistent solid results.
Remember that half the success will be in post with your ability to grade. You don’t have to be a colorist, even just playing around with sliders will give you half decent results, but I will say that really finessing it in post is what takes good footage and makes it great. I will also add that while presets are great sometimes, they seldom work across entire shots; I’ve seen the same preset have two wildly different results from the same clip shot from different angles. Remember if your frame changes or your lighting changes, so will your color grade/correct.
Happy flying and thanks for sharing!
Rs
LikeLike
Thanks for a most informative read. I’m a noob to aerial photography. Scouring the Web for pearls of wisdom can be a bit overwhelming. This post has been a great help. I’m coming from a background of commercial still photography and computer graphics so I have a good understanding of imaging composition and processing. Thanks for providing some great starting points. Shared knowledge promotes inspiration. (BTW I’m actually 58)
LikeLike
So glad you found it useful. It can be a bit daunting I’m sure, but once you start playing with it, I think you’ll quickly find the strengths (and weaknesses) of these little beasts. Image processing is really half the trick here, so you’re half way there;) (BTW I actually passed away during the Victorian Era and I’m a computer simulation. Im 219.)
LikeLike
Really found this post useful to a newbie to both drone flying and go pro videography. I do have a quick question you said to do 1080p 60fps and crank down to 24fps which looks good for aerial view shots but not so much if you’re taking video of a moving object as it tends to look slow. Sure does look smooth but it does make everything slower. Do you have any suggestions there or am I missing something?
LikeLike
That it does indeed… In your case if you are tracking something and need it playing back in real time, I would opt for the 4K setting at 30fps. This way you can also stabalize/repo in post if you need to. The 60 to 24fps really just gives your footage that buttery goodness, but if you are tracking live objects, then yeah, bigger frame size and 24 or 30 fps is the way to go. Happy flying!
LikeLiked by 1 person
I was almost there..how did you go from figure 3 to figure 4 in after fx?
LikeLike
you’re just cropping your image to get rid of the top and bottom curvature. There is a crop effect or you can draw a black matte. you’re basically putting black bars above and below your video, thats all.
If you want to change your comp size then command K will bring up the comp settings window. You can lessen your comp hight in there until you trip away the curvature.
Hope that helps!
LikeLike
Thanks for all the info…great article..helped me a bunch..
LikeLike
Youre very welcomed.
LikeLike
That is a very good tip indeed. I’ve always maintained the standard 4k resolution as they natively play on Vimeo and Youtube … Ive always felt if you start messing with the aspect ratio you might have issues especially embedding online – could be wrong tho – whatchathink?
LikeLike
How do you trim the comp size?
LikeLike
Cammand K
LikeLike
Thanks for the great post. Really helping me out on the camera / post production side of things, but I’m curious. You talk about using drones that are “hot rods”. Would you mind sharing what drones you use as well as what sorts of customisations you perform on them.
Again, thanks.
LikeLike
I’ve always used DJI drones. Mostly Phantom 2s and 3s. I buy them through DSLRpros as Cinema Kits; this way they come with monitors and advanced controllers so they are ready to fly right out of the pellican case (which they also come with). Here is a link: http://www.dslrpros.com/dslrpros-blog/dslrpros-introduces-the-phantom-2-cannes-edition-cinema-kit/
Recently I bought a Mavic, so that will be my go to in the future.
LikeLike
Hey Rob … frankly any drone is a good drone if thats the drone you have (5 times fast now) … I used to rock a fleet of Phantoms but have since upgraded to the Mavic and its fantastic.
LikeLike
The Internet never dies, and neither does wisdom borne of experience. Va Bene, Bravissimo, Maestro! E Grazie Mille for the pearls from the oyster. I follow your recommendations, but I do get jello occasionally when I pan. (Should I be using pot instead of pan? – never mind) So if one day you see this…maybe you can help a glaucoma man see!
LikeLike
Pot instead of Pan … Im stealing that!
LikeLike