
I use Lightroom… a lot. I use it cause I take photographs. A lot. It’s kinda like saying “I use forks a lot, because I eat all the time.” They go hand in hand. Anyway, I use it so much and I’m constantly amazed how easy it is to make semi-crap photos into semi-good ones, that I thought I share my process with you fine folks.
STEP 1: Take semi-crap photo.

These are my cousins, Bianca and Carlos, who live in Lima and make very fine Pisco. They are lovely people, super fun, and normally very good looking, unless I’m taking a picture of them with a cell phone in bad lighting. But we can fix that! With the power of LIGHTROOM!
Step 2: Follow the steps.
Lightroom (to me) is set up pretty well. Basically you just follow the natural order of adjustments from top to bottom. Here is the first panel:
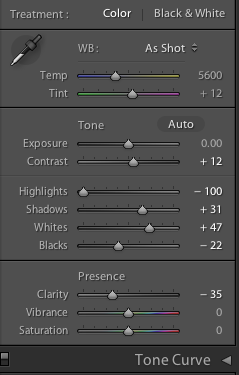
Fix your white balance (pro tip: Always use “auto” and let the computing prowess of the 21st century do that math for you) and exposure and contrast (pro tip: Never use “auto” here, as the computer has the lighting sensibily of your 83 year old uncle Gino who is legally blind).
First HIGHLIGHTS. The back window… totally blown out. Drop her down.

Holy Shit Vespucci!!! There’s mountains over there! Wonderful discovery… moving on. You may have found shit in the snow, but now your SHADOWS are too dark. Let’s give them some light.

Better. But more. We need to push up the WHITES. This will make the brightest sections of the photo brighter. What it won’t do is effect the mids or darks. When you slide it up you can look at your histogram to see the right side stretch. If none of this makes sense to you because you are my parents, don’t worry ma/pop, just slide the lever and trust.

Ok. Brightness wise I feel good… but the darks… getting a little milky. Let’s get them back down with the BLACKS slider. Always a race war with this goddamn Adobe.

STEP 3: Get some Clarity.
CLARITY is the best slider that was ever invented. Never before had such magic been available at your mouse pointer. Go left… you get soft, etherial, beautiful wedding photographs. Go right… you get HDR, contrasty, award winning photographs of bums. This is the puberty of sliders, and basically decides what kinda photograph your picture will be.
In our case, we love our cousins, so we want to make them pretty and nice. Going left will “bloom” the whites, which effectively makes skin look fantastic. It’s the equivalent to smearing Vasoline on your lens, but considering its not 1922 and Mary Pickford is no where to be seen, we do it digitally. And hey, no messy clean-up!

Already looking much better. Next panel (almost done) …
STEP 4: Go DEEP.

Sure. You’ve slid some sliders. You’re a pro right? You’ve seen nothing Charlie Chan. The real magic comes in the HSL panel. What does that stand for? Have Some Luck… getting this right. First, SATURATION. Your goal here is to reverse the effects of your shit digital camera’s desire to make everything SUPER GODDAMN COLORFUL. Why does everyones skin look like we drove to the restaurant on our faces? Too red. Drop the orange and red down until “normal” skin tone is achieved.

Humans. Nice. Next, LUMINANCE.
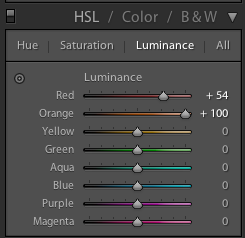
Such a sexy word. Here comes the biggest trick: make it look like you had a crew light the shot. The luminance color slider basically tells the computer to make that range of color ONLY lighter or darker. Why is this powerful? You can create highlights that weren’t there in the room. If we slide up the same orange and red sliders, we can make them a little lighter, meaning they will look like there was a nice little reflector or softbox just to the side of them. Instant highlights brought to you by Adobe Lightroom; Adobe Lightroom making your ass look smaller for over 25 years. The trusted name in photo manipulation.

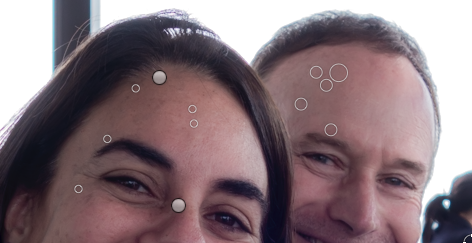
STEP 5: Magic Wand.

At the top is the little circle of magic called the “spot remover” or “lie machine”. This is a quick way to remove all the remaining human qualities you have so that you can look your best. A small constellation of corrections should do the job.
And with that your cousins should look like you remember them; beautiful, happy, and slightly inebriated at 2pm.

Here’s the thing that you should take away, while it may have taken you 27 minutes to read this tutorial, it took me literally 27 seconds to adjust this picture. That’s the price of education, and you’re welcome. Lightroom makes it super easy to make it look like you actually know how to use a camera in any situation. Thank you Adobe. Sure, you could go farther, do a little “noise reduction” to smooth the skin more, maybe add a gradient filter at the top and make the shot a little dynamic, but part of being a photographer is knowing when the chicken is done and ready to eat. Ding. Dinner time.
Before and after yawl. Hope this helps my Uncle Gino. It won’t, but hey, family.

Rs
P.S. – If… if… you wanna see some photos I’ve taken – head over to my Serrini Flickr page. I use to shoot for both Victoria’s Secret and Crumbs Cupcakes. So chances are hornball or butterball you will find something of interest.
